Back to JTB SmartBatch.
Quick Introduction
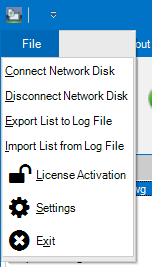
Install JTB SmartBatch using the download.
Run the installer file. Default installation path is C:\Program Files\JTB World\JTB SmartBatch.
Start with Settings and configure JTB SmartBatch to work the way you want it.
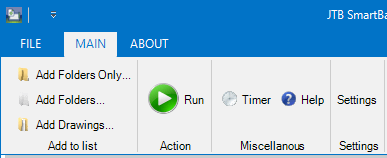
Select drawings to process using either Add Folders Only, Add Folders or Add Drawings.
Click on Run.
For deployment on multiple machines silent/automated installation can be done.
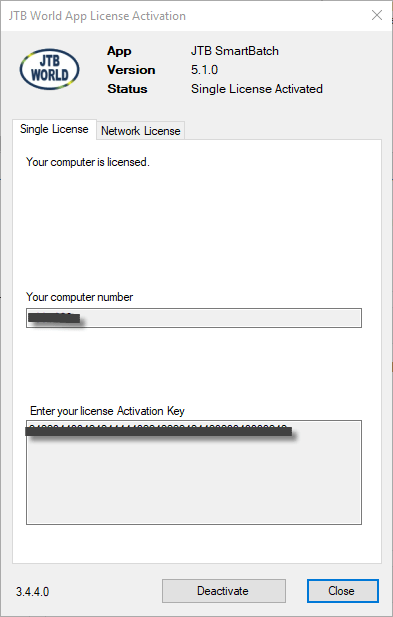
License Activation
Adding drawings
There are four methods to add drawings to JTB SmartBatch.

1. Drag and drop files and/or folders from Windows Explorer into JTB SmartBatch. If folders are selected you’ll get a question if you want to include folders and subfolders. This is the only way to select multiple folders at the same time.
2. Add Folders Only - This adds only a folder. The files are added to the drawing list when you start the script. This one should primarily be used when you want to script really many files. This one give you also the option to delete several files in all folders found, the file types that are deleted are specified in the settings menu.
3. Add Folders - This is to add all the drawing files within a folder or driver. It works recursively.
4. Add Drawings - This is to add drawing files to the list.
Run
Click on Run to start the processing and click on Stop to halt it.
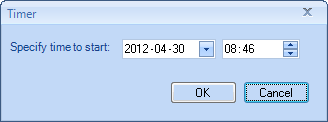
Use the timer to start the script at a specified time.
Drawing list
Filename - DWG or DXF file name. DWT is not supported but they can be renamed to DWG, processed and renamed back. Windows batch command to use: ren *.dwt *.dwg and other way around.
Path - Path for the drawing.
Version - File version: 2018, 2013, 2010, 2007, 2004, 2000, 14, 13, 11/12, 10, 9, 2.6, 2.5 or ??? if the version is not recognized. If it's a folder it shows FOLDER.
Status - OK, Skipped, Access Denied, ReadOnly, Timeouted, "Error: Could not open file" or Skip for files not to be scripted. Educational drawings can be in some AutoCAD versions be detected if AutoCAD is run in normal mode (not core console) and close popups automatically is being used (Best tool to identify educational drawings is EduFinder). The status "Error: Could not open file" might indicate that the drawing has to be recovered. Timeout can happen if digital signatures are attached to the drawing or if the purge process takes longer than the timeout limit.
Size before - size in kb.
Size after - size in kb.
Date before - modified time stamp for the file before the drawing is scripted.
Date after - modified time stamp for the file after the drawing is scripted.
Settings
The settings are saved in the registry, so you don’t have to change them again the next time you run JTB SmartBatch.
Restore button – Restores the settings to the default settings. This also includes the windows settings for the main JTB SmartBatch window and the column widths and positions of the listview.
General tab
![]()
CAD application:
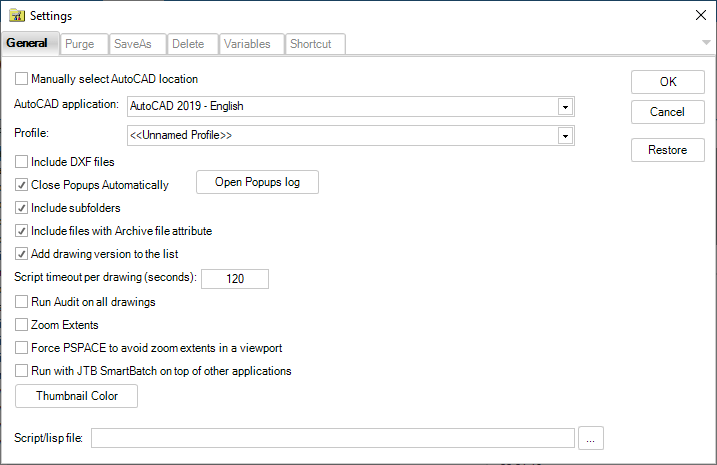
This combo box lists all installed AutoCAD applications. The default value is the application that is associated for the moment to the DWG-files. If you change the application it will also re-associate the DWG-files and use this application with JTB SmartBatch.
Profile:
This combo box lists the active profile for the active AutoCAD application. And if you want to change it select another one to be used by JTB SmartBatch.
"Manually select CAD location":
Alternatively specify the path to the executable. "Manually select CAD location" needs to be used for BricsCAD, GstarCAD, ZWCAD and other CAD applications.
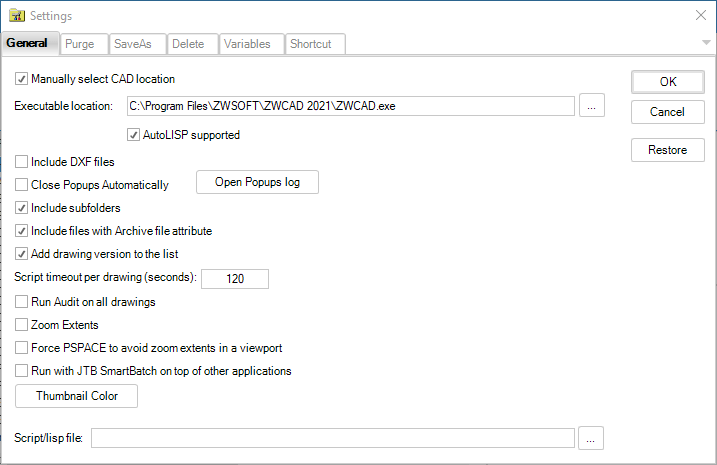
From AutoCAD 2013 and newer the AutoCAD Core Console can be used and will make scripting much faster. Browse for accoreconsole.exe that is found in the main installation folder where acad.exe also is located.
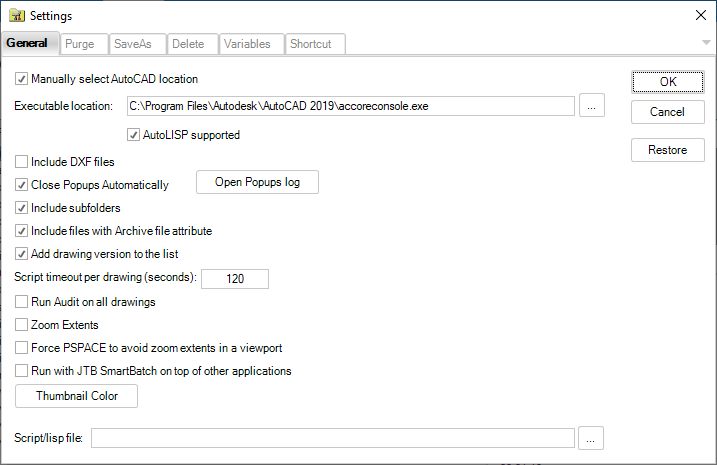
AutoLISP supported:
If AutoLISP is supported by the CAD application or not.

Include DXF files:
This filter makes it possible to also run DXF files. Some non standard formatted DXF's are not version identified but might be run anyway. The version is set to "DXF?". Until anyone wants it (just contact us) the DXF are saved to the closest matched DWG version.
Close Popups Automatically:
Dialog boxes are closed automatically making it possible to proceed with the scripting process uninterrupted. Click on the button to open the log file.
Include subfolders:
Works with the icon for adding folders and makes it possible to include subfolders in the file search.
Include files with Archive file attribute:
By having this one not selected the number of files can be drastically reduced if done before a backup. This way if you regularly use JTB SmartBatch it might be a good choice. But remember to have it selected the first time you run to include all files.
Add drawing version to the list:
If you chose to have this checked it will take a longer time as each file needs more time to process. But if you select a drawing in the list the version is always showed.
Script timeout per drawing (seconds):
Timeout for processing each drawing can be set. This makes it possible to let the scripting continue if something goes wrong with any of the drawings in the list. If you have large drawings or it takes long time to purge them you might want to increase this value. If the drawing is not finished processed within the timeout limit, the CAD application will be shut down and the next drawing will be processed.
Run Audit on all drawings:
Run Audit on all drawings to ensure the quality of them. It is the standard AutoCAD command Audit that is run.
Zoom extents Force:
Many likes to zoom the drawings to extents before saving. And it's possible by selecting this checkbox.
PSPACE to avoid zoom extents in a viewport:
If you zoom extents in paperspace and have a viewport in modelspace you might loose your zoom settings if the viewport is not locked. This can be avoided by this option.
Run with JTB SmartBatch on top of other applications:
This explains itself I hope.
Thumbnail Color button can be used to change the background color for the drawing thumbnail that shows when a drawing is selected in the drawing list.
Script/lisp file:
A script file can be loaded and executed as the last thing JTB SmartBatch does before saving and quitting. Since an AutoCAD is started with a script by JTB SmartBatch the main script will be stopped by the custom script that you have added. Therefore you have to add for example QSAVE and QUIT at the end of your script file. The functionality in JTB SmartBatch to save the file to a specific version is lost if script files are used. AutoCAD LT only supports script files. Script files has the SCR extension.
Full/vanilla AutoCAD and some other CAD applications supports LISP files (extension LSP, FAS or VLX). The lisp file will be loaded just before the drawing is saved.
Note that because of AutoCAD security settings your custom files might not load. You may see this error on the command line in AutoCAD:
; error: File load canceled:
To work around this look at the security settings in OPTIONS>System>Security Options. Make sure the file is in a trusted location.
Purge tab
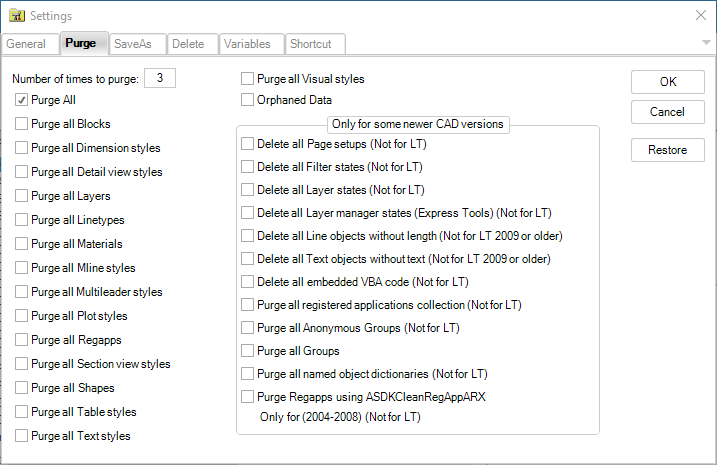
Always know what you do when you purge drawings. If you are not sure make sure to take backups of drawings before.
The Purge options in the left column are standard AutoCAD commands that are run using the -PURGE command.
Number of times to purge:
Enter a number between 0 and 5 for the number of times you want to purge each drawing. This is to allow for purging nested objects.
- Purge All
- Purge all Blocks
- Purge all Detail view styles (Works only for AutoCAD 2013 with verticals or later)
- Purge all Dimension styles
- Purge all Layers
- Purge all Linetypes
- Purge all Materials (Works only for AutoCAD 2007 with verticals or later)
- Purge all Mline styles
- Purge all Multileader styles (Works only for AutoCAD 2008 with verticals or later)
- Purge all Plot styles
- Purge all Regapps (Works only for AutoCAD 2005 with verticals or later)
- Purge all Section view styles (Works only for AutoCAD 2013 with verticals or later)
- Purge all Shapes
- Purge all Table styles (Works only for AutoCAD 2005 with verticals or later)
- Purge all Text styles
- Purge all Visual styles (Works only for AutoCAD 2007 with verticals or later)
- Purge all Orphaned Data (Works only for AutoCAD 2015 with verticals or later). Orphaned Data is linetype remains from Bentley MicroStation DGN files.
The following options will only be used if AutoCAD 2000+ is used or any of its verticals.
- Delete all Page Setups
- Delete all Filter states
- Delete all Layer states
- Delete all Layer manager states (Express Tools)
- Delete all Line objects without length (Works with AutoCAD LT 2010 or newer too)
- Delete all Text objects without text (Works with AutoCAD LT 2010 or newer too)
- Delete all embedded VBA code (WARNING)
Be very careful when using this settings because some applications using the drawing might malfunction.
DWG files can have embedded VBA (Visual Basic for Applications) code and is deleted using this option. - Purge all registered applications collection (WARNING)
Be extremely careful when using this settings because some applications using the drawing might malfunction.
Applications made by Autodesk or 3:rd party developers might create registered application collections. Much of the intelligence of many objects will be lost.
Extended data is grouped by registered application name. Registered application names correspond to APPID symbol table entries. An application can use as many APPID names as needed. APPID names are permanent, although they can be purged if they aren't currently used in the drawing.
Make sure to take backups of drawings before using this option. - Purge all Anonymous Groups
- Purge all Groups (This includes anonymous groups.)
- Purge all named object dictionaries (WARNING)
Be extremely careful when using this settings because some applications using the drawing might malfunction.
Applications made by Autodesk or 3:rd party developers might create named object dictionaries. For example this will mess with drawings made in ADT. ADT styles, display configurations and a lot more will be deleted even if they are used! Much of the intelligence of many objects will be lost.
Embedded VBA code will also be deleted using this option. NOD: ACAD_VBA
This will remove references that holds materials attached by AutoCAD Color Index used by RMAT even if it's used. NOD: AVE_ACITABLE
AutoCAD features like table styles will be purged.
A drawing's relation to a Sheet Set will be removed.
Even images in the drawings will be destroyed!!!
Make sure to take backups of drawings before using this option. - Purge Regapps using ASDKCleanRegAppARX.arx (2004-2008)
Be extremely careful when using this settings because some applications using the drawing might malfunction.
Applications made by Autodesk or 3:rd party developers might create registered application collections. Much of the intelligence of many objects can be lost.
Make sure to take backups of drawings before using this option.
Extended data is grouped by registered application name. Registered application names correspond to APPID symbol table entries. An application can use as many APPID names as needed. APPID names are permanent, although they can be purged if they aren't currently used in the drawing.
Does not work with AutoCAD 2010 and newer.
SaveAs tab
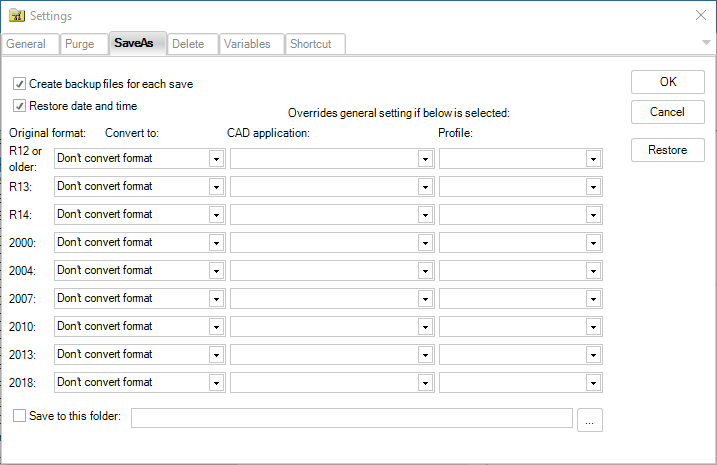
Create backup files for each save
If checked ISAVEBAK is set to 1 when the script is run. It is restored after the script is ended. If JTB SmartBatch crashes you might have to restore this setting manually.
Restore date and time
This option makes it possible to restore the date and time of the file to what it was before the scripting.
Convert
R12 or older, R13, R14, 2000, 2004, 2007, 2010, 2013, 2018
The following options are available in the dropdown list
"Don't convert format" : If the file is R12 or older and you run AutoCAD r14 the file is saved as R12 format. But if you run AutoCAD 2000 or newer it cannot save to R12 so it saves to R13 format instead.
"R2018 DWG" : Files are saved in 2018 format.
"R2013 DWG" : Files are saved in 2013 format.
"R2010 DWG" : Files are saved in 2010 format.
"R2007 DWG" : Files are saved in 2007 format.
"R2004 DWG" : Files are saved in 2004 format.
"R2000 DWG" : Files are saved in 2000 format.
"R14/LT98/LT97 DWG" : Files are saved in R14 format.
"R13/LT95 DWG" : Files are saved in R13 format.
"R12/LT2 DWG" : This option is only possible if you run AutoCAD r14. Otherwise the file is saved in R13 format.
"Don't save" : This option makes it possible to chose not to script files of a certain version.
Overrides general setting if selected:
Select first an AutoCAD application, then you have the option to chose a profile.
It can be used if you want for example AutoCAD r14 to run R14-files and ADT 3.3 to run 2000-files.
Save to this folder:
Check the box if you want the drawings to be saved into the folder in the box to the right. If not checked the drawing is saved over the existing drawing. To get a folder click on the button with three dots or just enter the path manually.
Delete tab
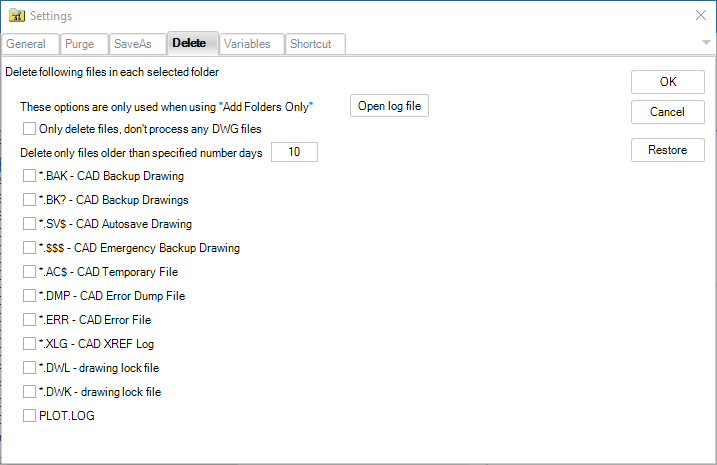
-Open log file: Quick access to deleted files log file through new button on Delete tab.
-Only delete files, don’t process any DWG files - It’s possible to only delete certain “garbage” files without having to also run AutoCAD to purge and process custom scripts. Use the “Only delete files, don’t process any DWG files” checkbox.
-Delete only files older than [10] days
Specify number of days. Could be set to 0 to even delete today's files. The following extensions can be searched and deleted at the beginning of the scripting. Observe that you have to use "Add Folders Only" to use this option since it will only search in the folders and the subfolders added this way.
*.BAK – If checked the AutoCAD Backup Drawings are deleted before scripting.
*.BK? – If checked the AutoCAD Backup Drawings (like BK1, BK2) are deleted before scripting.
*.SV$ – If checked the AutoCAD Autosave Drawings are deleted before scripting.
*.$$$ – If checked the AutoCAD Emergency Backup Drawings are deleted before scripting.
*.AC$ – If checked the AutoCAD Temporary Files are deleted before scripting.
*.DMP – If checked the AutoCAD Error Dump Files are deleted before scripting.
*.ERR – If checked the AutoCAD Error Files are deleted before scripting.
*.XLG – If checked the AutoCAD XREF Log Files are deleted before scripting.
*.DWL - If checked the this lock file is deleted before scripting.
*.DWK - If checked the this lock file is deleted before scripting.
PLOT.LOG - If checked the this plot log file is deleted before scripting.
Variables tab
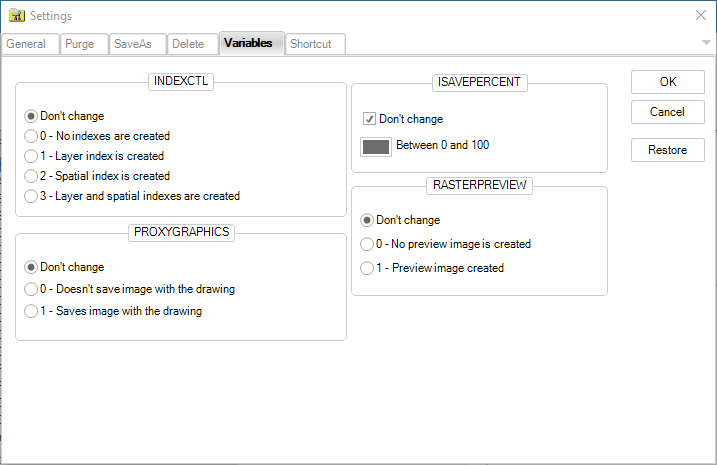
These are system variables that are used by AutoCAD but can be controlled using JTB SmartBatch.
AutoCAD LT is not supported for this.
INDEXCTL
Controls whether layer and spatial indexes are created and saved in drawing files.
Saved in each drawing by AutoCAD.
Don't change
0 - No indexes are created
1 - Layer index is created
2 - Spatial index is created
3 - Layer and spatial indexes are created
Without indexes will make the smallest files but the performance can be ten-fold if the indexes are used depending on the drawings and how they are used.
ISAVEPERCENT
Determines the amount of wasted space tolerated in a drawing file. The value of ISAVEPERCENT is an integer between 0 and 100. The default value of 50 means that the estimate of wasted space within the file does not exceed 50 percent of the total file size. Wasted space is eliminated by periodic full saves. When the estimate exceeds 50 percent, the next save will be a full save. This resets the wasted space estimate to 0. If ISAVEPERCENT is set to 0, every save is a full save.
Saved in the registry by AutoCAD.
Don't change
0-100
For optimal size set ISAVEPERCENT=0
PROXYGRAPHICS
Specifies whether images of proxy objects are saved in the drawing.
Saved in each drawing by AutoCAD.
Don't change
0 - Does not save image with the drawing; a bounding box is displayed instead
1 - Saves image with the drawing
Having PROXYGRAPHICS=1 will make some files much larger then having it set to 0. ADT drawings are one example of drawings that will be very large having it set to 1.
RASTERPREVIEW
Controls whether BMP preview images are saved with the drawing.
Saved in the registry by AutoCAD.
Don't change
0 - No preview image is created
1 - Preview image created
The Preview image is adding some kb to the drawing size.
Shortcut tab
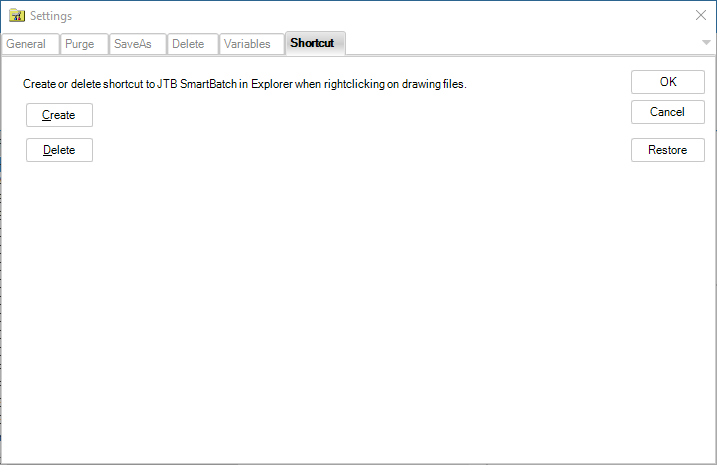
Create or delete shortcut to JTB SmartBatch in Explorer when right clicking on drawing files.
Tips & Tricks
Tips found on our blog:
- Purge of DWG takes for ever - solution
- Detect educational plot stamped drawings with JTB SmartBatch
- INTERNAL ERROR: Attempt to access AecUiBaseServices after shutdown!
- Why SmartPurger can batch run AutoLISP files directly
- Remove Sheet Set association on a sheet drawing
- AutoCAD 2008 and Annotation Scale template
- Delete AutoCAD layer filters
- Change attribute order of block or redefine a block in many CAD drawings
The first time you run JTB SmartBatch it's recommended that you only try a few drawings to see it works in your environment. Use also the feature to save the purged drawing to an alternate folder.
Observe that the first time you run JTB SmartBatch you should go to the Settings and change the values as you want them.
JTB SmartBatch can make use of AutoCAD Core Console that was introduced in AutoCAD 2013 making the scripting process faster then ever as the Core Console takes less than a second to open per drawing. In a test using the Core Console took 11 minutes compared to normal AutoCAD 2013 that took 58 minutes to process 145 drawings.
By preparing a special AutoCAD profile and run JTB SmartBatch with that one. That profile might not load as many menus as the one you usually have. For example if you have AutoCAD Architecture, makes a profile that doesn't load ACA menus.
You can save older drawings to another format. This is useful if the drawings are missing the preview icon. Purging is optional.
To sort the list click on one of the column headers in the file list. If you click on the header a second time it changes from ascending to descending.
Resizing of the column is possible by dragging between two column headers.
You can drag on the column header to move a column.
To select more than one file in the file list use Shift or Ctrl.
To select all files in the file list press Ctrl+A.
Files that are read only or opened and locked by any AutoCAD session are not processed.
Really corrupted files are not processed, they are skipped.
If JTB SmartBatch is minimized AutoCAD will also run minimized. But notice that this disables the automatic closing of some dialog boxes that might result in a timeout.
If you want to filter out what drawings to run you can use the search function in Explorer and then drag and drop the drawings into JTB SmartBatch.
Why does JTB SmartBatch not make the drawings smaller? A 4kB drawing is now 26 kB! That could be because the old file was in another version and or it didn't contain the preview picture. Otherwise you might notice that a file of 100kB goes down to 75kB or something else depending on how well it was purged before.
The BAK files are not deleted even if I selected the settings on the Delete tab to delete BAK files. The deletion happens before any DWG's are processed and if the setting on the tab SaveAs is set for "Create backup files for each save" a new BAK file will be created.
Start the app with command line argument /importrun to enable running unattended a list of drawings that have been previously exported. Could be used with for example Windows Task Scheduler.
Have you got any of these pop up message when opening a drawing?
This application has detected a mixed version of AEC objects
participating in this operation.
Newer AEC objects will be dissalowed from participating in this operation
or
This application has detected objects from a newer version
in this drawing.
Some commands will not be available.
Save this drawing from the original application as AutoCAD 2000 format
either with AEC objects exploded, or with ProxyGraphics turned on,
and attach it as an Xref in order to use it as a background.
or
ARX ERROR: eDuplicateKey
This might be because you have used ADT 2004 when working on the drawing. If this was unintentional you can remove references that triggers this by using the "Purge all named object dictionaries" option. But be aware that this might make the drawing malfunctioning. Use with caution.
Information about the older version 2.8:
SmartPurger 2.8 documentation can be found in the SmartPurger Help file. If for some reason the file will not open at all, right-click
the .chm file, click Properties, and then click Unblock (this button is on the general tab). You might also need to save it to your hard disk to have it working.
Version 2.8 installation tips:
Installation on Windows Vista requirements that might be needed: Disable User Account Control (UAC). Restart the computer. Download and install Msvbvm50.exe from http://support.microsoft.com/kb/180071 Right click on Msvbvm50.exe and select Run as Administrator, after that right click on SmartPurger setup.exe and select Run as Administrator. Enable UAC.
If you run into getting a dialog box saying "Run-time error '339': Component 'acThumb.ocx' or one of its dependencies not correctly registered: a file is missing or invalid" see this blog post for a solution.
How to convert multiple DWG files to DXF:
Our JTB SmartBatch app could be used together with a simple script like the below (save to a file with .scr extension) that save each drawing to DXF with JTB SmartBatch.
Script code starts below:
FILEDIA
0
_SAVEAS
DXF
_V
2013


FILEDIA
1
QUIT
;
Script code ends with the QUIT above and the last row can be empty or having a semicolon.
Depending on how you want the DXF files to be created you might want to modify it slightly.
Drawings saved in DXF format have these additional prompts.
- Decimal places of accuracy. Specifies from 0 to 16 decimal places.
- Binary. Creates a binary DXF file. Binary DXF is generally faster and more compact than ASCII DXF files.
- Select objects. Prompts you to select specific objects to be saved in DXF format.
- Preview. Specifies whether you want to save a thumbnail image of the saved file.
- Version. Specifies which product version to use for the saved DXF file.
Vault tips:
Check out a folder to Work Space.
Run JTB SmartBatch on the files.
Check folder back into vault.
Known Issues
Partial opened and saved drawings might cause timeout as some commands like PURGE are not allowed.
Purge Regapps using ASDKCleanRegAppARX.arx (2004-2008) should only be used if you have AutoCAD 2004 up to AutoCAD 2008.
If JTB SmartBatch hangs with AutoCAD running and the drawings gets timed out the reason can be that you have some of the palettes opened automatically. It might look like this on the command line:
Command: EXTERNALREFERENCES
Command: _ToolPalettes
Command: _aecprojectbrowserstartup
Try to make sure these are not opened automatically.
1. Click Tools menu within AutoCAD > Options.
2. In the Options dialog box, click the AEC Project Default tabs.
3. Select to not show the Project Browser at Startup

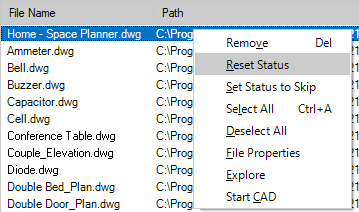 Remove - Remove selected drawing from the list view